If you’re a techie, you’ve probably heard of the shiny new Windows Terminal. While not currently available via an official Microsoft build, I decided to give it a spin – which, due to Microsoft’s commitment to Open Source over the last handful of years, is now possible!

Essentially, the new Windows Terminal is a wrapper application of sorts that allows for a tabbed CLI interface for all supported command line environments within Windows. Bash (via WSL)? Check! Powershell? Check! Old faithful CMD? Check, check and check!
Of course, unifying all CLIs isn’t sexy enough for Microsoft in 2019 – no sir! In addition to providing an all-in-one interface for the various CLIs now running under Windows, a slew of customization features have been added as well – with more currently in the pipeline for the coming releases.
This post isn’t intended to be an installation/build tutorial, but instead is more of a fluff piece detailing my personal experiences getting up and running, as well as a couple of tips and tricks picked up in my little bit of time spent tinkering.
I was able to get running relatively easily. I found the official readme instructions for the project pretty solid – getting me 99% of the way there. If you’ve not tried, I’d recommend visiting the Github link and checking out the Getting Started section: https://github.com/microsoft/terminal#getting-started
One of the first things you’re likely to notice is the requirement to be on Windows build 1903 ( >= 10.0.18362.0). Though by no means complicated, this was by far the longest part of the setup for me. Initially my efforts to manually download and install the build update proved fruitless, largely due to me having missed a required incremental update between what I was running when I started and 1903. Fortunately, a couple of quick Googles revealed that mere mortals, such as myself, could use the built in Windows Update to get to 1903 – once I got all of the required updates in place, I was eventually presented with the option to install 1903.
After getting Windows 10 up to 1903, I realized that I didn’t have Visual Studio proper on my newest dev machine – this proved to be the next longest part of the process. Having been using VSCode exclusively for the last year+ doing Angular dev (and in part due to no longer having a personal MSDN), I’d just not found a need for Visual Studio until now. Being a bit out of the loop on the IDE, I decided to go with the latest and greatest – installing 2019 Community.
There you have it – the bulk of the technical work. 1) upgrading Windows 2) installing Visual Studio. With these two time sinks out of the way, I was able to follow the rest of the instructions pretty much directly and get a working build (note: as mentioned in the readme, I was prompted to install some additional tooling as a result of opening in 2019, but this was seamless and handled automatically by VS).
The observant observer is probably thinking “Well… Okay… Lots of words to essentially say ‘I did it by reading the linked instructions’… Why am I reading your post?” Well, let me ask you a couple of questions, in turn, observant friend… Do you like running your app after building? Do you like animations in your CLI to breakup the mundane monotony of executing command after command? Well, then you’ve come to the right place! Keep going!
Running Windows Terminal
If you’re like me, you found yourself doing a victory lap after CTRL+Shift+B didn’t blow up your PC. If you’re like me, then you likely found yourself scratching your head about which one of the many build output artifacts you should be haphazardly clicking on in order to see your awesome new Windows Terminal. The answer: “None of them”. Something that wasn’t quite clear to me was that the application actually needs to be locally deployed in order to properly run. To deploy, simply right-click the ‘CascadiaPackage’ project and then click ‘Deploy’. Note: If you’re following the instructions, you’ve enabled Developer Mode, which is required – if you’re not following the instructions, then shame on you.

Once deployed, you should be able to locate “Windows Terminal (Dev Build)” in your Start menu.

Okay, great! We have a terminal!!! But… we already had a terminal (or few)… So what?
Multiple CLIs – One Windows Terminal
Towards the top right of your terminal window, you should see a ‘+’ and down arrow. Fortunately for me, Windows Terminal picked up all of my currently installed CLIs – PowerShell, CMD and Ubuntu Bash via WSL. If I want to open up another instance of the default CLI (PowerShell for me), I can simply click the ‘+’ and it will open a new tab with a new CLI instance! Additionally, key bindings are likely similar to what you’re used to in other apps – CTRL+T to open a new tab, and CTRL+W to close the current tab.

You can also click the down arrow in order to get a drop-down list of all of the configured CLIs – selecting one to open an instance of that CLI in a new tab!

But what if Windows Terminal didn’t pick up all of my CLIs? Or what if I add additional CLIs (say via different Linux subsystems)? Enter ‘Settings’. When you click settings, you’re likely to be prompted for which viewer/editor you would like the profile config file to be opened with – in my case, I just went with the suggestion default of VS Code. Once open, you will see a JSON file containing the default configuration for Windows Terminal similar to the following:

By scrolling down, you can find the individual CLI profiles – here are a couple of mine:

While I’m not 100% of the various configuration properties, I’ve learned enough to be dangerous – I’ve learned enough to set things on fire… But we will talk about burning the house down shortly – for now, back to the topic at hand. If your desired CLI isn’t automatically found, you can easily configure it by copying/pasting one of the existing configurations as a new ‘profiles’ entry, and then modifying the commandline and other relevant properties to suit your needs! Easy peasy!
Animate All The Things!!!

So back to setting things on fire… Odds are you found yourself going down this rabbit hole not out of your hate of having multiple windows open, but instead because you like shiny new things as much as I do. Odds are you probably saw a really cool demo showing fancy color schemes and backgrounds and thought “holyfugginshizbawls! I can haz animated CLIs too?!”. Well, as fate would have it, you can! While I again am not 100% on all of the configuration possibilities, I’ve fumbled around enough to figure out how to animate my various CLI instances – which I will share with you here.
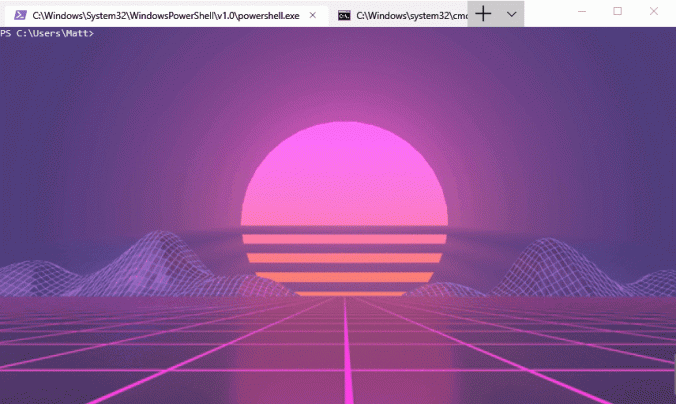
To get started, we need a new property in our profile config – “backgroundImage”. This string value may point to a local image file, or (best I can tell) any network accessible image file that your little heart desires… But who really cares about regular old static images anyways? What is this? 1999? Fortunately, not only are static images supported but so are ANIMATED GIFS!!! By setting the value of this property to a path string to an animated gif, we are enabled to razzle-dazzle all inferior onlookers with our clearly superior terminal.
Behold and be amazed!
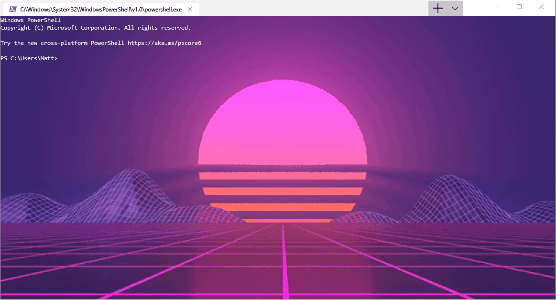
Another setting of interest is ‘backgroundImageOpacity’, which (hold on to your seats!) allows you to set the opacity of the CLI instance’s background. Here’s my PowerShell configuration rocking the synthwave:

Something that’s worth noting, and something I don’t yet fully understand – ‘useAcrylic’ in relation to using ‘backgroundImage’. In my experiences thus far, I must set useAcrylic to false in order to set a background image and have it actually load – when set to true, my CLI instance seems to fall back to simple color configurations (with Acrylic’s glassy transparency goodness, of course).
Here Be Dragons
So far, I am digging the new Windows Terminal. That said, it’s not been the most stable of experiences for me personally. As I’ve tinkered, I’ve found myself in a non-operational state multiple times with the Windows Terminal – at which time a full reboot has been my only discovered recourse. I’ve not quite nailed down what causes the ‘Abort’ crash – so far, it just seems to happen after the Windows Terminal has been up and running for some unknown period of time. Eventually, Windows Terminal will vanish, with an error dialog indicating a problem – with the process crashed, there’s no process to terminate, but subsequent attempts to relaunch will result in the same error message being displayed until reboot… more to come.
Anywhos. I hope that you’ve enjoyed reading about the Windows Terminal as much as I’ve enjoyed learning about it! Happy tinkering!
-Matt