I was today years old when I learned of the BroadcastChannel Web API, which facilitates intercommunication between windows, tabs, frames and iframes on the same domain (thanks to Cory House on Twitter).
At a glance, the API is surprisingly simple, so I figured why not give it a spin.
After consulting the ever-valuable MDN Web Docs on the topic, I had a BroadcastChannel spun up in a matter of seconds – here’s the overview and demonstration of it in action.
To setup my playground, I simply opened up a new Chrome window – and then 2 tabs, which I pointed to my blog here. At this point, all that’s left to be done is to new up an instance of BroadcastChannel in both tabs, setup an onmessage event listener in the receiver tab, and then to broadcast a message from the sender tab.
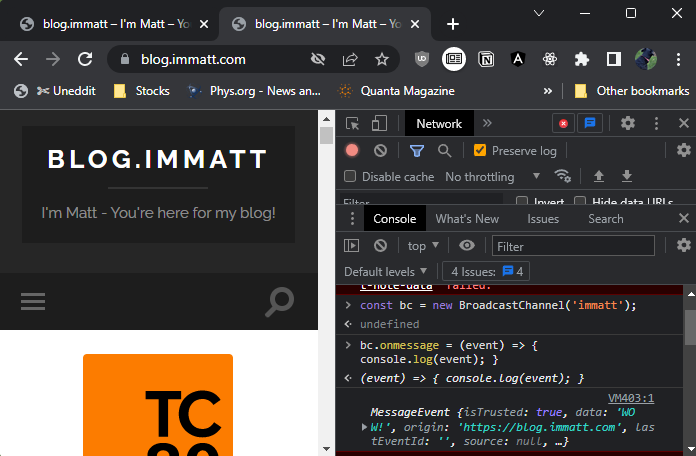
Here we have our ‘sender’ tab in tab 1 – where we’ve instantiated a new BroadcastChannel, setup an event listener, and then posted a new message. Note: We could have skipped setting up the listener here, but I wanted to demonstrate that the sending tab doesn’t display the posted message. Here we have our ‘reciever’ tab in tab 2 – where we’ve instantiated a new BroadcastChannel and setup an event listener. As we can see in the last visible debugger frame, we recieved our ‘WOW!’ message from tab 1. Note: The ‘WOW!’ message was sent from tab 1 after setting up the listener in tab 2 – previously posted messages from other tabs are not recieved in tabs/windows/frames instantiated after the message has been broadcast.
Cool, cool, cool. So pretty simple – here’s the explicit flow of this experiment in case it’s not clear from the screenshot captions:
Open 2 tabs on the same domain – ‘https://blog.immatt.com’ in my example
In tab 1, create a new BroadcastChannel instance via “new BroadcastChannel(‘channel-name’);”
In tab 2, also create a new BroadcastChannel instance for the same channel name – e.g. “new BroadcastChannel(‘channel-name’);”
In tab 2, setup an event listener for the ‘onmessage’ event exposed on our BroadcastChannel instance
Back in tab 1, broadcast a message to all subscribers of our channel by using the ‘postMessage()’ function exposed on the ‘sender’ instance of BroadcastChannel
Check back in tab 2 to see our super awesome message!
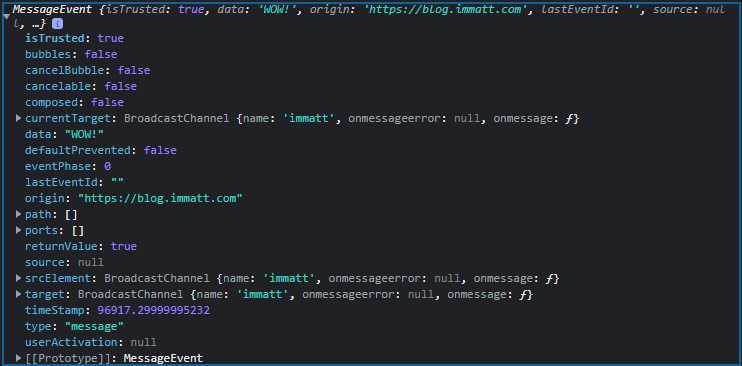
Here’s the expanded console object of the recieved message for a better look at the MessageEvent payload:
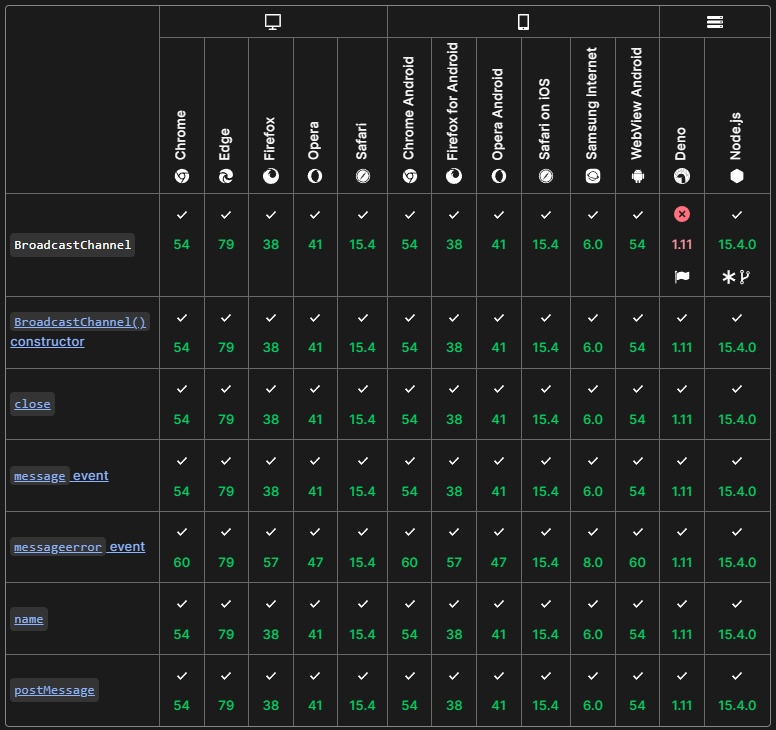
Also worth mentioning, browser compatibility is pretty solid – with it having landed in most major browsers around 2015/2016 (except Edge, which was 2020).
Anywhos. There you have it… Inter-tab/window/frame/iframe communications via the BroadcastChannel Web API!
I recently found myself on yet another Angular + Bootstrap project. Usually, when spinning up a new Angular Bootstrap project, this means npm installing a library like @ng-bootstrap, but this time we wanted to keep things as vanilla as possible.
“How to use Bootstrap in an Angular application without jQuery?”
Since we’re in Angular, and since it’s generally considered a bad idea to use jQuery in an Angular project (though it is most certainly possible), we were forced to think about how to best use Bootstrap “from scratch”.
Up first – get a major pre-req out of the way… It’s been a while, so I guess I should ensure I’m on latest LTS😲
Install Node and NPM
For this project, we’re also going with the latest and greatest from Angular, so…
Ensuring the global @angular/cli is up to date – using v14 here…
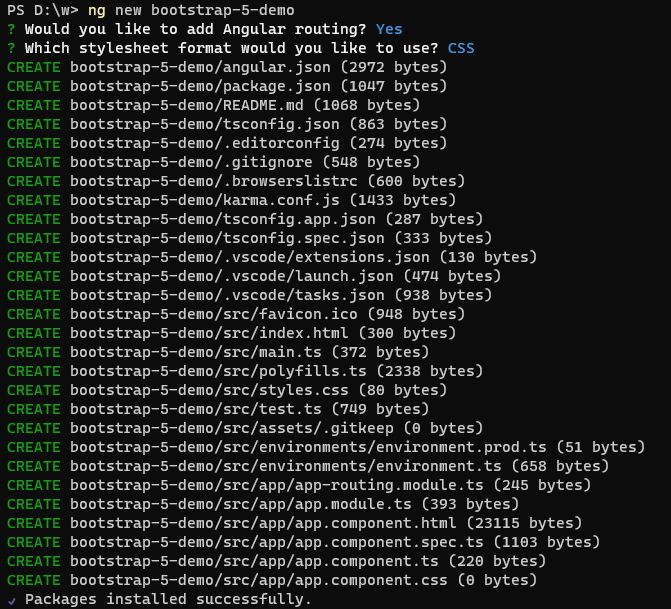
Now lets get a clean Angular workspace spun up…
> ng new bootstrap-5-demo
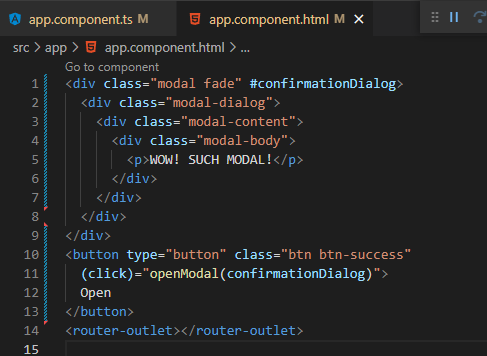
For simplicity, we will start slow – simply displaying a Modal from the AppComponent in the presentation of a Confirmation Dialog.
I’m opting to go with a Modal because it’s a frequently desired component of Bootstrap, and I believe that it allows us to demonstrate a number of angles with regards to using a Bootstrap Modal ‘natively’ from Angular (without jQuery).
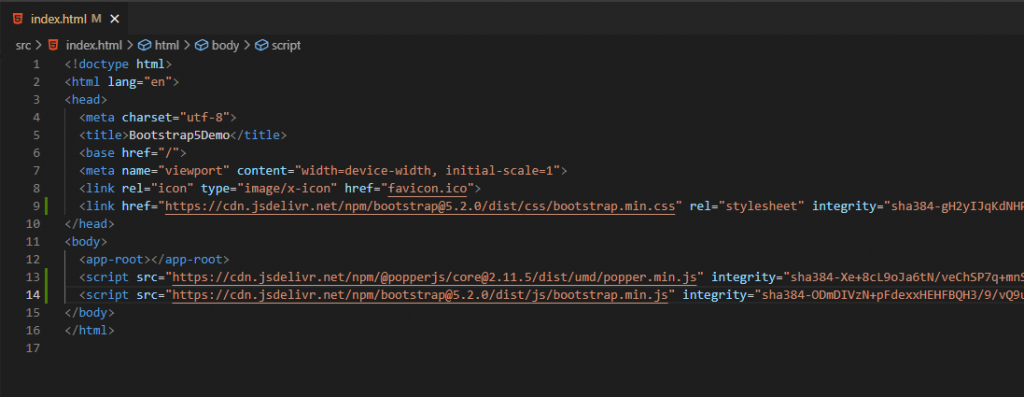
Normally, I’d opt to go with self-hosting for my libraries, but since this crash course is more focused on how to use Bootstrap natively in an Angular application rather than productionizing the solution, I’m just going to use a CDN from the Bootstrap getting started docs to get things wired up.
Setting up Bootstrap and the Popper dependency in index.html
To make things a bit easier on ourselves, we’re also going to install the Bootstrap types package from the Definitely Typed project as a developer dependency in our project.
npm install @types/bootstrap --save-dev
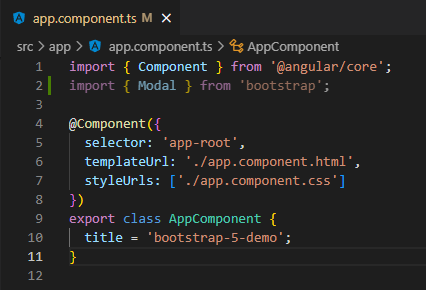
Now that we have the basics set up, let’s start in our AppComponent by importing Modal from bootstrap (via the @types/bootstrap package installed in the previous step):
Importing Modal with help from the @types library
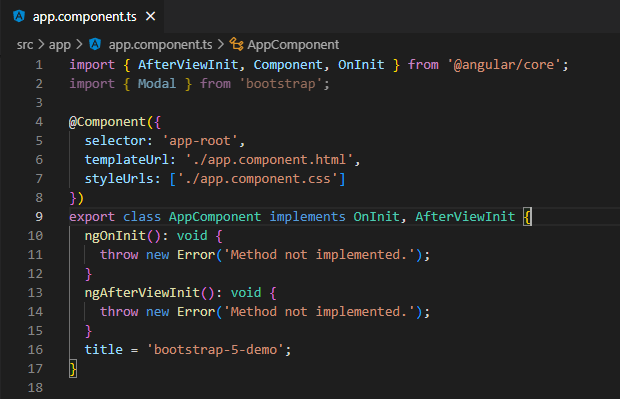
To get our Modal setup, we’re going to utilize the AfterViewInit lifecycle hook to wire up our event listeners so that we can respond to our Modal instance:
Getting AfterViewInit in place
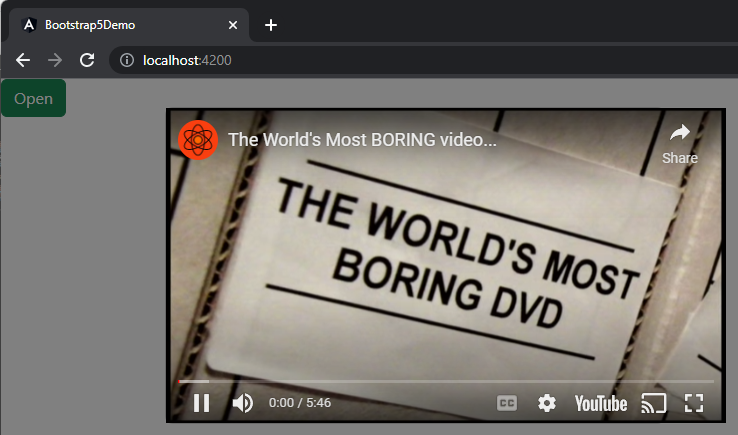
As a sanity check, let’s go ahead and wire up the Modal as simply as we can – triggering the modal show with a button click:
Basic Modal scaffolding and a button passing in the HTMLElement via the ‘confirmationDialog’ template variable to the openModal method.Basic openModal implementation – instantiating a new Modal and assigning it to our private ‘confirmDialog’ property.
As you can see in the above code, we’re able to simply create a Modal instance in TypeScript-land thanks to our @types/bootstrap library -then we can simply call ‘show()’ to open our new Modal:
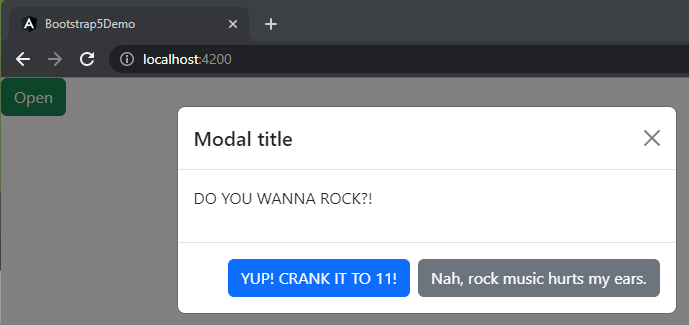
WOW! SUCH MODAL!
Okay. That’s all well and good, but unless we’re just wanting to show some static message, this Modal is pretty lackluster.
Let’s go back to our AfterViewInit lifecycle and set some things up… But what exactly? Perhaps we should go take a quick, cursory glance at the Modal docs…
Modal Events
Alright… So we’ve got a handful of events we can respond to… For the purposes of this example, we’re going to focus in on ‘hide’ and ‘show’.
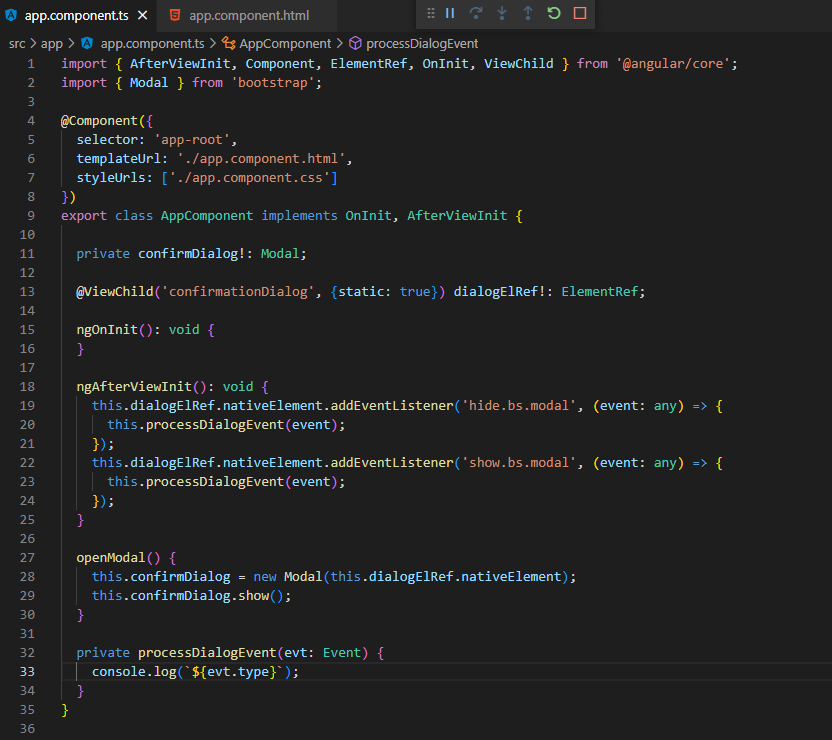
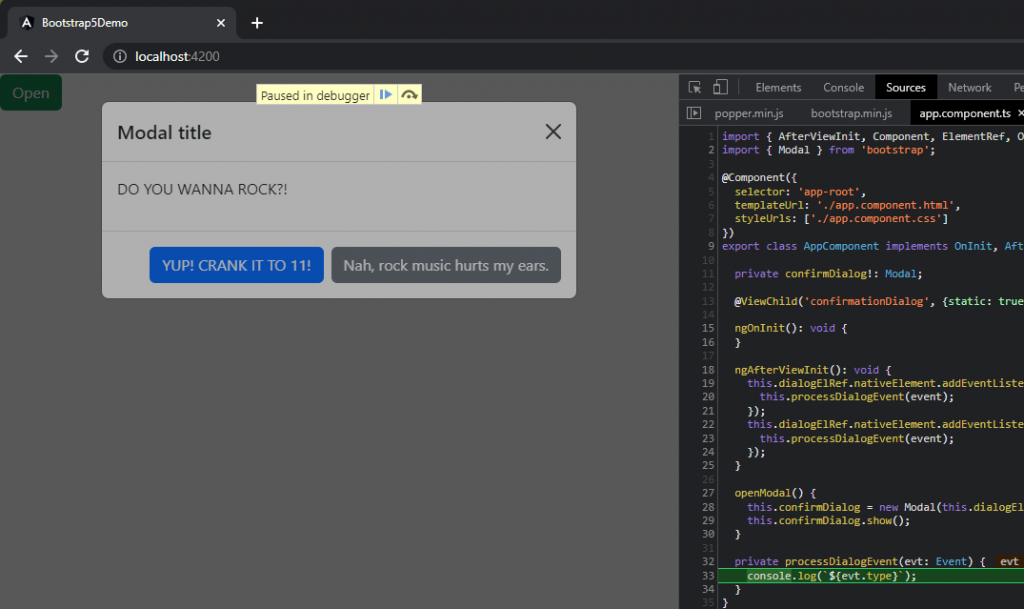
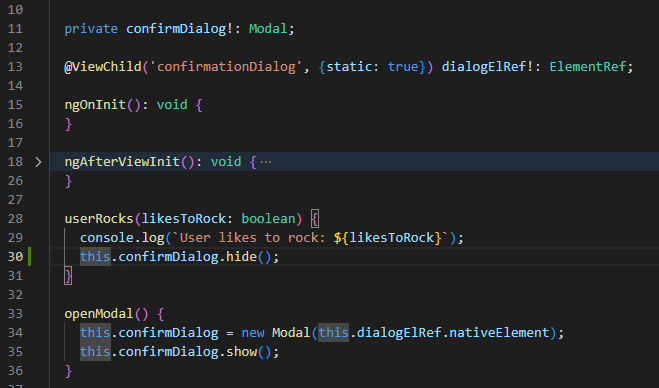
In addition to wiring up event listeners for ‘show’ and ‘hide’, we’re also going to change our implementation a little bit – rather than passing in the element from our template, we’re going to access the element via the @ViewChild property decorator. And lastly, we will log our events to the console:
Getting Modal from template via @ViewChild decorator rather than passing in to click handler
Some points to note in the above code… We’ve introduced the Angular property decorator @ViewChild(…) – this has enabled us to stop passing in the element from the template via the template variable as we were originally doing. We’ve also added some code to our ngAfterViewInit lifecycle method, which is responsible for listening to the ‘show’ and ‘hide’ events – simply logging the ‘type’ property associated with the Event via the processDialogEvent() method.
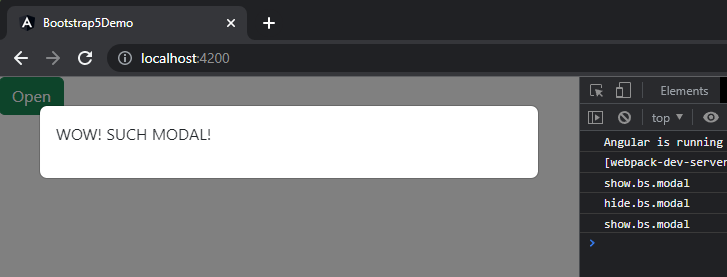
Let’s check it out:
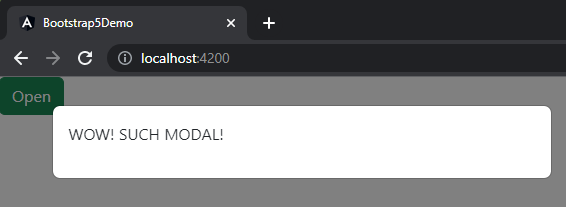
WOW! SUCH MODAL!…still…
Whelp… Still pretty lackluster… One could be forgiven for mistakenly concluding we’re just showing the same demo as earlier – but we know they’d be wrong because this is a completely different monster altogether (since we’re using ViewChild and listening to/logging events now)!
Alright… Let’s get this thing done… Right now, we just have a message modal – but we need a confirmation dialog… So we will spruce things up a bit with some formatting/structure and we will add a couple of user prompts – something for them to confirm (or not).
Hamming up the Modal a bit
And here’s how it looks in action:
New Modal look
Now it’s starting to look more like a proper confirmation dialog!
Something I’d like to point out at this point in the process. Remember our event listeners? Perhaps you noticed we added a new ‘X’ close button element, and that this element has an interesting ‘data-bs-dismiss’ now present. Bootstrap supports interaction via data attributes, and this attribute demonstrates how to close this modal instance using one such data attribute – read more here in the docs. Oh, yeah – and the event listeners? Still listening – even when we’re closing via the data attribute:
Still listening for events from the Modal even through we’re explicitly handling clicks
But we still need to do something about those button clicks… And as cool as being able to close the modal via the data attribute is, we don’t really know if the close was by clicking outside of the dialog or if it was intentional via the ‘X’ – and I’d think the ‘X’ could commonly be interpreted as “No”, as where closing via clicking outside of the dialog could be “I’m declining to answer right now”, and that perhaps we want to handle those two interactions differently.
First up, let’s add a new method to assess if the user likes to rock or not – ‘userRocks’:
Getting user response
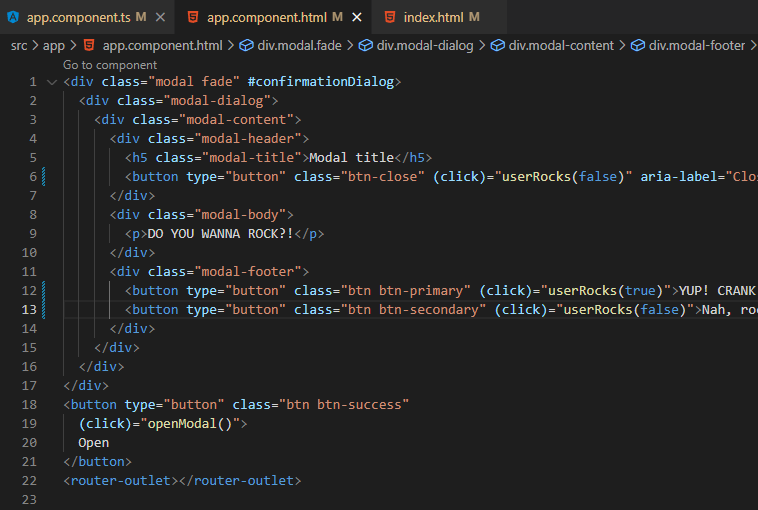
Next, let’s wire this up on the template to the ‘X’ close button and the other choice buttons – passing ‘true’ when they do and ‘false’ when they don’t (I have a feeling those ‘false’ ones rarely get used, and only by people you probably wouldn’t enjoy writing apps for):
Wire up user actionable controls so that the application can react
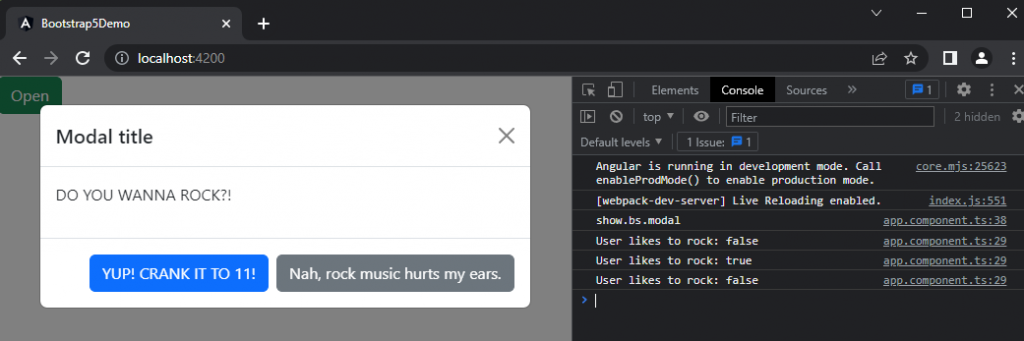
And let’s see it in action:
Updated view of Modal
Cool-cool-cool. Looking more and more like a proper Confirm Dialog by the minute! But we have a bit of an issue… We know if the user rocks or not – but most users would expect the dialog to do something other than log to the console, which they wouldn’t even be aware of unless they’re a super 1337 hacker looking at the console while trying to find their exploit.
Let’s start simply by having the modal hide after the user has provided an answer… Easy enough – let’s just modify our userRocks method to call ‘hide()’ on our Modal instance:
Closing the modal after user input
Now we’re cooking! Let’s put this baby to bed! At this point in time, we have a functional confirmation dialog that allows the user to let us know if they like to rock or not – all that’s left is to do something based on the user’s willingness to rock.
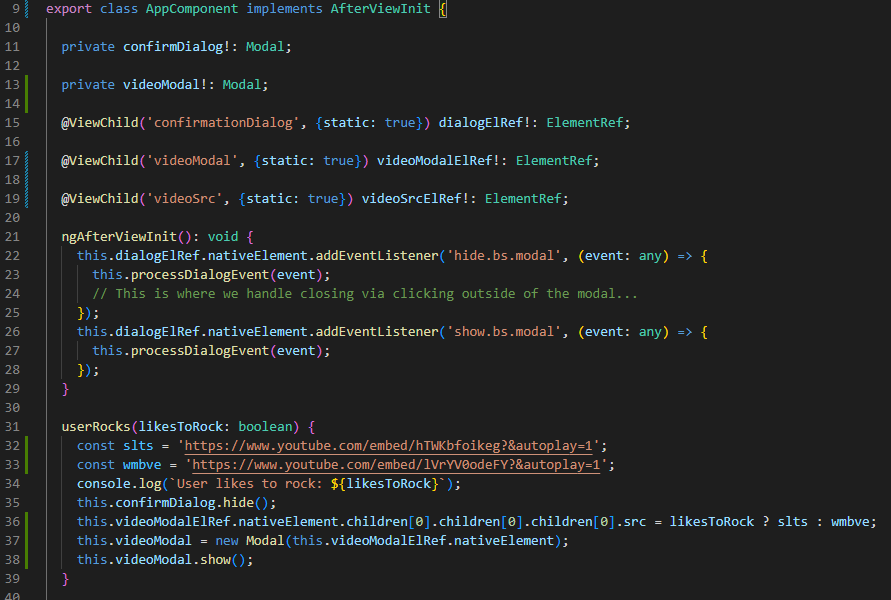
For the sake of brevity (🤣🤣🤣 Never been a strong suit of mine), we’re just going to introduce a few lines of code to our userRocks method and some supporting code to our AppComponent implementation. Namely, we’re going to add another Modal (why not?! This is a Modal example, afterall!) as well as another ViewChild that makes accessing an element within the Modal a bit easier so that we can mess with it in our userRocks() method based on the user’s input.
Here’s our updated component TS:
The whole shebang!
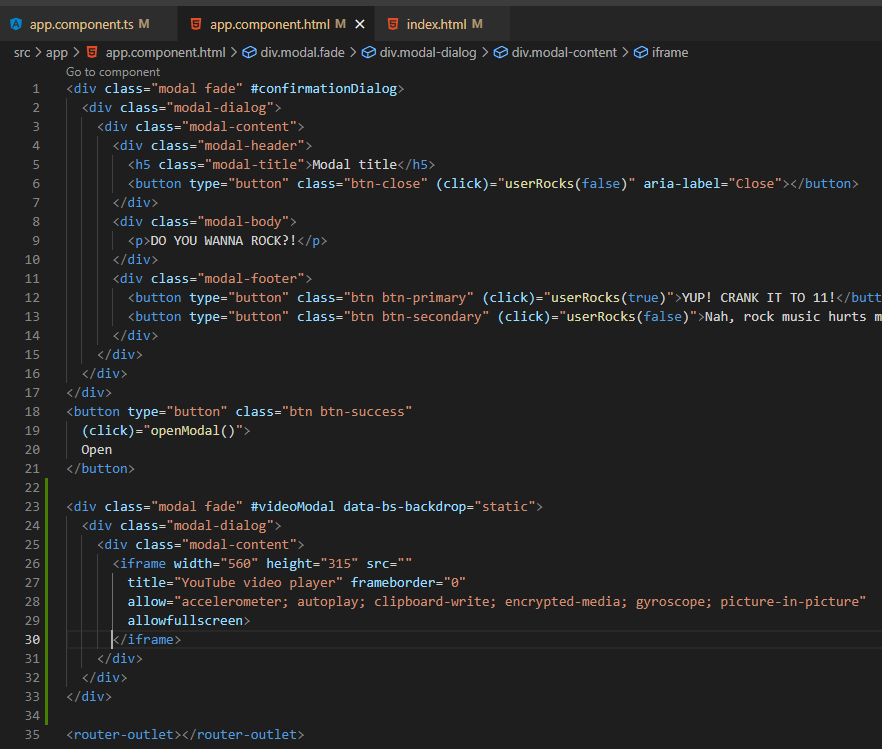
And here’s our updated template:
The rest…of the whole…shebang…
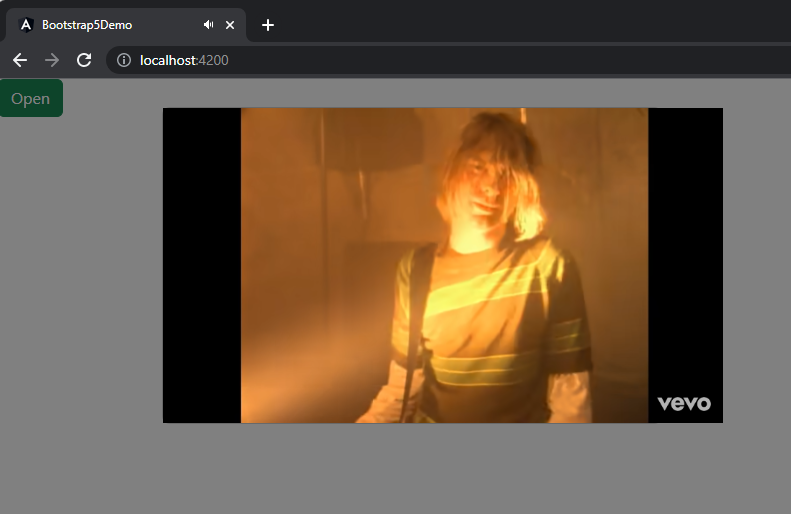
And here’s how it looks running:
A done-ish Modal
We like to rock:
Rocking out…
We have sensitive ears and “refined” musical tastes:
Not rocking out…
There you have it – how to use Bootstrap 5 from Angular 14 ‘natively’.
While we really only covered the Modal here, many/most of the approach we’ve reviewed here translates to other Bootstrap Components.
I hope that you’ve found this helpful and perhaps even a little entertaining. If you would like to check out the full source for this project, feel free to check out the project here: https://github.com/mattezell/bootstrap-5-demo
Okay, okay… I’m sure Facebook, Instagram, WhatsApp, and Co won’t be going anywhere anytime soon – but today has been interesting.
Unless you live under a rock and/or actually followed through with your declaration to leave Facebook “for totes real this time”, you’re likely very aware of today’s outage of some very popular services.
With a mixture of cries, sighs, and giggles, the world has been collectively forced to come to terms with what a day in their life without Facebook/Instagram would look like.
To me, one of the highlights today has been the brand clowing taking place on Twitter (unquestionably the dominant social media platform today), which has included Facebook brands, such as Instagram and WhatsApp, playing along themselves.
I won’t go too deep into the technical, as there are people far more qualified than I who have already done so (here’s one from ArsTechnica). But basically, there are services that monitor and share routes that are used to make devices/services communicate with other devices/services on the Internet (RGP – Border Gateway Protocol) – and a configuration update was pushed(reportedly by Facebook themselves) that deleted the routes that told the rest of the Internet how to access the Facebook-owned stuff.
To add insult to injury, reportedly the Facebook staff tasked with cleaning up this mess have been locked out of the physical locations that they require access to as a result of this screwup 🤣 Making matters worse, both Facebook/Instagram users, coupled with client applications (such as the Facebook and Instagram apps installed on Phones that automatically poll for updates), are hammering all of the DNS services that play a role in getting users from point A to point B, bringing these vital services to their knees. We’re now hours into the outage, with no end in sight – it’s almost as if the Internet is a house of cards, just waiting to collapse (Narrator: “it is”).
tl;dr – The popping issue is likely caused by the audio device’s power-saving configuration – and so changing the configuration may eliminate the issue.
I wanted to do a ‘quick’ write up on the ‘audio popping issue’ that many Thinkpad owners have reported, as well as a solution/workaround. I recently purchased an X1 Extreme Gen 2 and quickly noticed the annoying popping issue once I got everything setup with my typical desktop arrangement – e.g. USB C dongle connected to HDMI, with external speakers connected to the LCD receiving the video/audio signal over HDMI.
As many others have reported on various forums around the Internet, the issue essentially manifests as an audible popping noise, which is generally observed just before a sound begins playing or within a few seconds after the sound stops playing. People who play music/video all day often don’t even notice it, as the audio device never actually toggles power states as it is constantly active. The most common way to reproduce the issue when troubleshooting is ensuring that no audio has played for a few seconds, and then playing a short audio file such as a WAV – at which time an audible ‘pop’ may be heard before the sound plays and shortly after the sound finishes.
It’s worth noting that I already somewhat knew where to look to work around this issue, as pretty much every laptop I’ve purchased in the last decade have had this popping issue in one way or the other – and the approach described in this post has by far been the most successful for me in addressing this issue on the various laptop models on which I’ve encountered it.
Overview of Issue
At the heart of this issue is power management settings coupled with hardware operational realities. Within the registry are various settings responsible for controlling the various devices within your computer (amongst other things) – some such settings are ones dealing with how devices are handled when not considered as being in use. For audio devices, this is generally 3 settings:
ConservationIdleTime – this setting controls how long to wait before the device is considered idle when the power management is in a conservation state.
IdlePowerState – What state should the device be moved to when either of the idle time windows has been met.
PerformanceIdleTime – this setting controls how long to wait before the device is considered idle when the power management is in a performance state.
So, essentially our registry is saying “depending on the current power management mode of the PC, change the power state of this device to something else after a period of time of inactivity has passed”.
Unfortunately, this powering down of an audio device isn’t as smooth as we’d often hope. Due to the powering down and powering up of the device, there’s often an audible pop associated with the power state change – and so we’re seeking to eliminate the power state change in order to eliminate the associated popping noise.
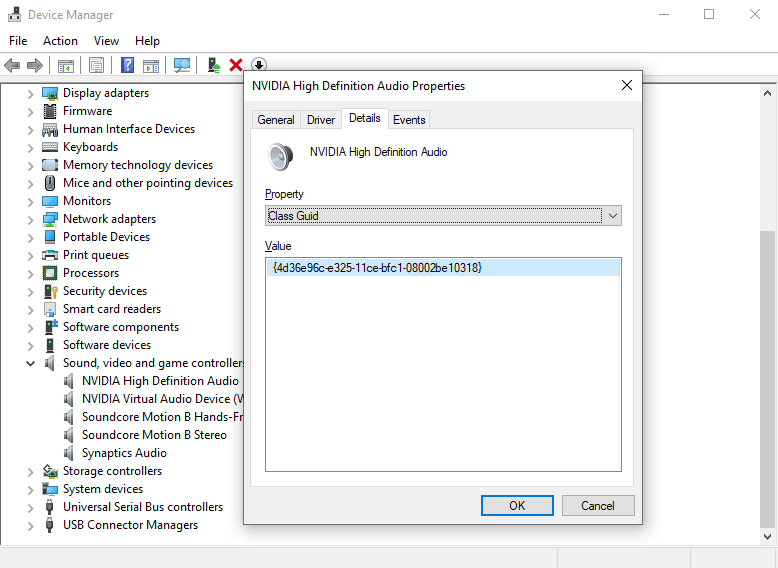
Most computers have multiple audio devices – and often all of those devices are affected by this popping issue, though not always. In this writeup, I’m going to focus on the audio device that I am actively using and having this issue with – and I may, at a later time go adjust the others if I identify a need to do so. In my specific situation, I’m using the NVidia High Definition Audio via HDMI – and so we will focus on that.
Screenshot showing NVIDIA High Definition Audio being used
Modifying the Registry
WARNING: You can mess up your PC via the registry, so proceed with caution when using regedit.
When working with the registry, you’re likely to find a lot of key/value collections that appear to be the same if you go searching around – and this is because they are, as the registry actually uses pointers to find the active setting in play. Ultimately, we’re concerned with ‘CurrentControlSet’ as this is the collection pointing towards the actual settings.
Here is my registry path for the targeted audio device (NVIDIA High Definition Audio):
Note: I will provide all matching collections at the end of this document for reference.
Since I am currently experiencing the popping issue on the NVidia High Definition Audio interface, I’m going to focus on the PowerSettings in the CurrentControlSet for this specific device. To ensure that we’re modifying the correct part of the registry, we can check out our device in Device Manager and ensure that our Class Guid matches the GUID in our registry path (e.g. 4d36e96c-e325-11ce-bfc1-08002be10318):
Confirming Matching Class GUID in Device Manager vs Registry Path
What we’re seeking to accomplish here is to prevent Windows from putting this audio device into power saving mode – as ultimately it is the power saving mode that’s causing the audible pop when a sound isn’t actively being played.
As you may have inferred from the Device Power States document, a state of D0 is the ‘working state’ and D1, D2 and D3 states are various power-saving modes supported by the device.
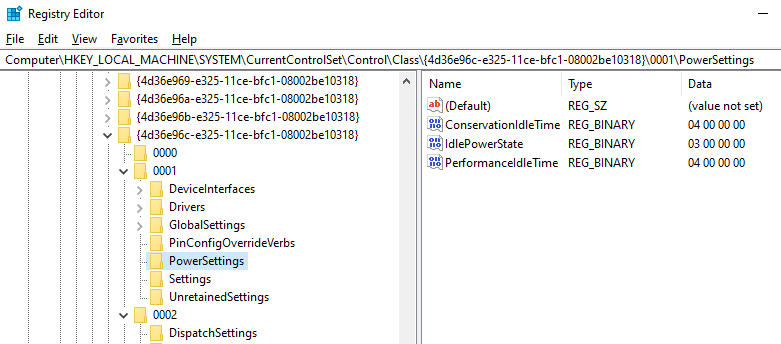
When looking at our registry configuration, we see the following:
As one may have expected, we see the IdlePowerState for this device is 03, which corresponds with D3 – the most aggressive of the various power-saving states. D3 essentially cuts the device off – it’s this cutting off that results in the audible pop. With consideration of all of the applicable settings here, we’re seeing “when in conservation mode and in performance mode, consider 4 seconds the idle time – when 4 seconds has passed, set the device’s power-saving mode to D3”.
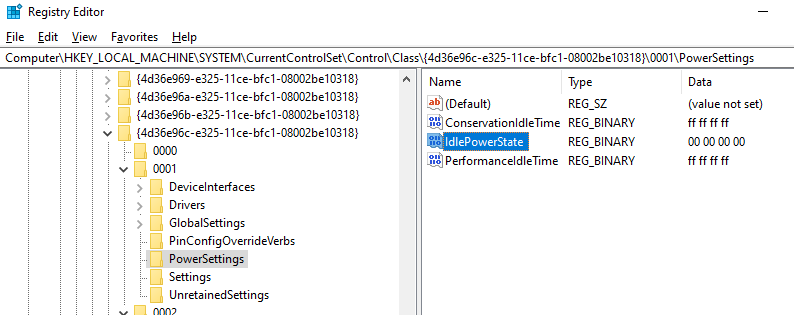
I’m going to go a bit of overkill here by setting the idle time to something that won’t be realistically hit in normal usage, as well as setting the idle mode to ‘working state’ (D0).
As you can see in the above screenshot, I’ve set the idle times to FF FF FF FF – which translates to 4294967295 decimal, and since this setting is for seconds it means we’ve made it so that 49,710 days must pass before this device is considered idle… As can also be seen from the screenshot, we’ve changed the Idle Power State from D3 to D0 – so even if the idle time is hit, the device should remain in the active D0 state.
After making our changes, we simply need to reboot the PC for them to go into effect. Note: We’re only making changes for Windows, so if you’re experiencing this issue under Linux then you will need to perform similar operations to change how the driver handles power management there.
Conclusion
After making the discussed changes, my pops have essentially gone away. Now I only notice a pop the first time the speakers become activated in my Windows session, as well as when shutting down.
I figure that it’s logical to assume that this may have an impact on battery life since we’ve essentially disabled power management for this audio device, though I am not certain how severe this impact is.
I also don’t know what other side effects this change may have on your system – so proceed with caution, with the understanding that I am not responsible for you borking your system 🙂 As mentioned, I’ve done this on multiple laptops over the years and they are all still functional.
Good luck! -Matt
Misc
All Registry Matches on my Thinkpad X1 Extreme Gen 2
Not much of a post, but I wanted to share (with all 2 of you) anyways.
Like much of North America, I spent the later part of my Sunday evening staring slack-jawed at the sky to witness the full lunar eclipse and blood moon.
Space never ceases to amaze.
Here are a few pictures that I captured during the eclipse – taken with my old S3IS, as well as my el cheapo Bushell 1.25″ telescope coupled with my S9+.
I have recently been building an API using NestJS (Angular-like dev flow for writing Expressjs apps in TypeScript). While developing under Windows is pleasant enough, I was somewhat surprised at how painful deploying the application to IIS via IISNode can be. I quickly discovered that Nodejs applications often don’t behave identically when running under IISNode. I also quickly discovered that debugging an application running IISNode isn’t particularly straight forward in 2018. If you’ve found yourself reading this post, you’ve likely discovered as I have – that IISNode support in 2018 can be difficult to come by, despite IISNode still being a cornerstone to Nodejs support on Windows.
As I hit my first obstacles with IISNode, I of course fired up Google and started looking for guidance. While I found a number of posts and writeups detailing how to debug an IISNode hosted app, most of what I ran across was dated and seemingly no longer works. If you find yourself going down this rabbit’s hole, you will quickly find many threads on StackOverflow and github without any real resolution. I really started to sweat when I ran across the official original IISNode github repo – which has largely been abandoned for a number of years. (At least now the repo points you towards the slightly better maintained Azure fork due to a little Twitter exchange).
Since things do behave differently at times under IISNode, the ability to debug is crucial – and without it, I found myself debating rewriting my entire API to a stack more recently supported for IIS debugging. But before throwing the baby out with the bathwater, I figured I would try a couple more things to see if I could salvage my API codebase.
Since the documented debugging approach no longer seems to work, and since there are so many unanswered problems regarding this on StackOverflow and GitHub, I figured my time and energy was better served elsewhere. While perhaps a solution does exist to get the documented debugging approach working, many who have come before me have seemingly failed – and ultimately abandoned using IISNode as a result. I don’t want this to be me.
Developing a NodeJS application on Windows in VSCode is a very pleasant experience when running under NodeJS directly. Node module support in Windows by popular libraries has come a long way over the last several years – and so most things just work. Knowing that we already know and like the VSCode approach, I figured this was a good starting point – “get VSCode setup to debug an IISNode hosted application somehow”.
In reviewing the VSCode node debugging info, I ran across “Attach to Remote”. While my intent was to debug the staging environment locally in VSCode (vs remotely), I figured this was an approach that I’d not yet tried and so was at least worth a glance. I further assumed that VSCode wouldn’t particularly care if I was attaching to some remote IP or a local one, so long as I was checking off all of the required boxes.
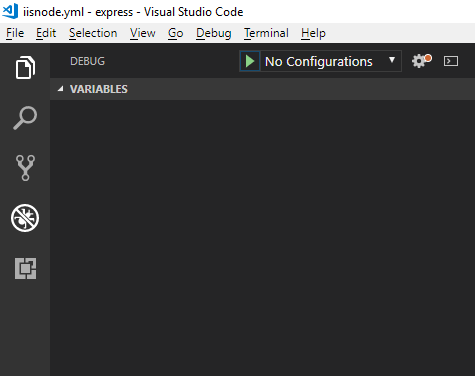
By default, VSCode doesn’t have any launch configurations setup for our project. Since there are no default configured launch profiles, you should find a screen similar to the following when you click on the ‘debugging’ icon (4th icon on the left menu). To get started, we need to create a launch.json, which will populate the debug dropdown currently displaying ‘No Configuration’.
No Launch Configuration
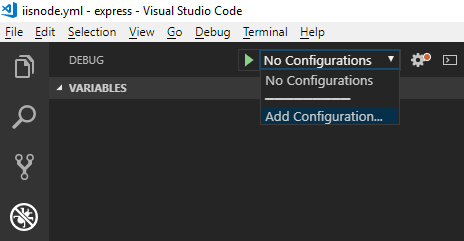
We can manually create the “.vscode/launch.json” file in the root of our project if we desire, but I’m going to let VSCode do that for me. Let’s start by clicking on the the dropdown that currently reads “No Configurations” – and then selecting “Add Configuration”, before finally selecting “Node.js” as our environment.
Adding a new configuration.
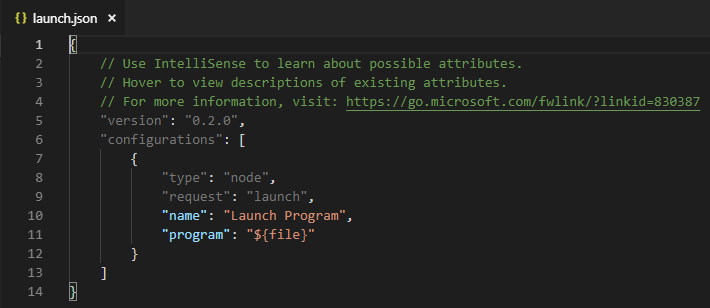
You should now be staring at the generated launch.json file, which most likely looks like the following screenshot.
Generated launch file
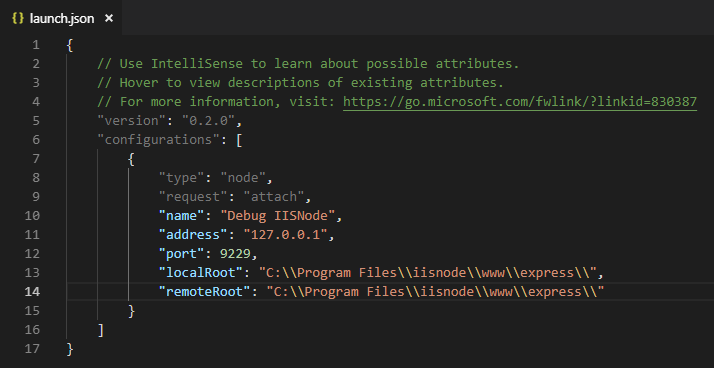
Since we’re just here to get debugging working, we’re just going to edit this configuration rule rather than creating a new one. We can begin by changing the value for “request” to “attach”. Let’s go ahead and update our name to something more accurate too – “Debug IISNode”. We can delete the “program” setting altogether. Now we need to add a few more settings – namely “address”, “port”, “localRoot” and “remoteRoot”. Some of these values will vary based on your local environment – see the screenshot below for mine.
Debug config in launch.json
As you may have noticed when reading my “localRoot” and “remoteRoot” values, I am simply debugging against the express example that’s installed by the IISNode Full installer. You can debug any Nodejs application that you desire by updating these paths accordingly.
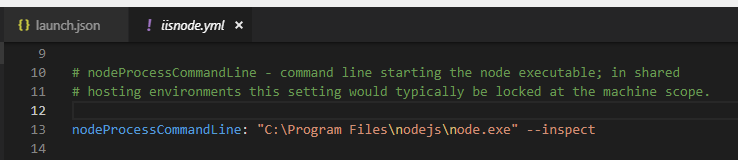
Since the Express example application doesn’t have a iisnode.yml, I’ve copied the one included in the ‘configuration’ example that was also installed by the IISNode Full installer. We will need to make a few modifications to the copied iisnode.yml to get things working like we want. First, we’re going to need to uncomment the “nodeProcessCommandLine” setting and ensure that the path is the correct node.exe path – we’re also going to want to add ‘–inspect’ following the closing quotation as you see in the screenshot below, as this is the glue that makes debugging possible.
Setting up nodeProcessCommandLine to inspect
Another change to the iisnode.yml setup that you will likely want to make is to make sure that ‘nodeProcessCountPerApplication’ is set to 1. By default, IISNode will spin up 1 node.exe instance per processor that you have on the machine – and so you may find some unnecessarily complications when debugging against 4 instances of your application at the same time.
While I am uncertain if this helps anything, I also like to update my iisnode.yml to disable the build in debugging which no longer seems to work in 2018. This is optional, and I have found that our VSCode debugging will work regardless – I just like to do this to eliminate any possible unwanted magic. I also, at least initially, like to enable logging in my iisnode.yml, as it can help identify startup issues happening before your logic is up and running (and hopefully logging).
With everything saved, it’s a good idea to restart out website in IIS. Truth told, this shouldn’t be required as changes to the web.config and iisnode.yml should trigger a reload, though I’ve previously ran into issues that I believe perhaps were related to not all changes being properly loaded, so I now just do this explicit restart for good measure.
Now, using a tool like Process Explorer, we can inspect the node.exe instance that IISNode is using and see that it’s been launched with the “–inspect” flag.
Inspecting node.exe to see the ‘–inspect’ flag
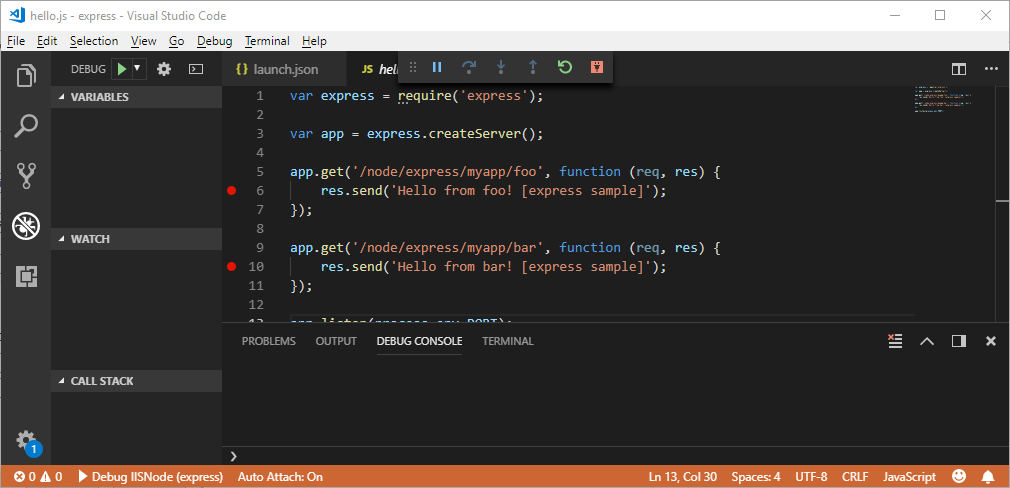
Now we just have to launch our new debugging config. Once it’s selected from the dropdown, we can either click the ‘Play’ button or press F5. Since we’re trying to debug, it’s probably a good idea to set a breakpoint or two.
With the debugger attached, we can now visit our running application – once we hit a route associated with our breakpoints, we will find that we now have a fully functional debugging environment in VSCode for our IISNode handled application!
Hitting a breakpoint in VSCode!
I didn’t see this documented elsewhere, and so figuring this out was a bit of a challenge – hoping that this saves a little bit of headache and heartburn!
Howdy again, lone reader (okay.. there’s actually 2 of you…)!
I’ve recently continued to work with Angular 6 and have really enjoyed the updated experience! As mentioned in the last post, I’d recently been presented with the challenge of finding a way to secure the implementation details of a library in a way that continued to support JIT and AOT builds.
As previously discussed, while some success was found with Angular 4 using Rollup, I could never get a single package capable of JIT and AOT – and instead had to rely on a process of generating 2 packages (one for our builds and one for 3rd party devs). And as previously discussed, I’ve found this process to be much more streamlined in Angular 6 due to the first class library generation support that Angular 6 brought to the table via ng-packagr.
I am an an enterprise architect who currently calls the arena of Fintech home. Years ago, we set out to modernize our main client facing systems and their supporting APIs. For the front end, we set our targets and AngularJS and didn’t look back. Our challenge wasn’t a small one – coming from a .Net and Java heavy world in terms of our existing code bases, part of our systems included a 3rd party ecosystem which allowed partner developers to extend our base functionality. Not only could partner developers extend the system’s core functionality, but they could also package up their extensions in a manner compatible with our systems so that they could be resold to other organizations who also benefited from this new functionality.
The initial release of our revamped, albiet feature-limited system, was very well recieved – and almost immediately the ecosystem began to grown around it at a pace nearly exceeding our ability to continue to build out our initial system… A good problem to have – and so we continued to iterate and release.
As anyone who works in “Enterprise Development” knows, IP is an important point of focus – companies often require first and foremost that trade industries be protected, and that key implementation details be locked away under lock and key. Of course due to the core realities of JavaScript, this posed us an interesting challenege – in that you’re highly limited in the ways that you can protect your propritary logic without breaking things. But ultimately we persisted and prevailed – obfuscation and minification got us past our requirements so that we could forge ahead with our new stack based on ‘web technologies’.
For our system, which was based on AngularJS 1.5, we found the decorator pattern to suit us quite nicely when faced with the requirements of ‘code protection’. Using the decorator pattern, we were able to provide developer guidance documents which served to expose extenibility points via documentation. While less than perfect, it worked pretty well for us and our clients – particularly when you consider the reality of JavaScript development, where API documentation was king, vs TypeScript development, where Typings are king (and more or less a requirement).
Fast foward a year+ and several iterations later, we found ourselves with a functional codebase now ported to Angular 4. Angular 4 provided us some new and interesting challenges – namely that the ballgame, and its associated rules which we had build our system around had changed. While we had completely redesigned our extensibility approach, which is outside of the scope of this document, we were faced with the very real problem of the 3rd party developer flow, which had seemingly degraded from Angular 1.x to 4.x under our design.. While I can’t go too far into the details, a lot of the 3rd party work had to be done out of band – integration testing with the core platform required round trips to the build server under our design just to get a working environment to test your enhancements (which may have been broken due to an errant keystroke that had gone unnoticed before pushing for the build – so you had to do it all over again).
As a stop-gap, we devised a new approach; though also far from optimal. As we should have, we shifted the burden from the 3rd party developers back to ourselves. How we accomplished this initially was via 2 different Angular npm packages of our core functionality. While we tried time and time again, we could never get “one library to rule them all”. What we could come up with was a system backed by 2 different builds of our core library. 1) The developer pacakge, which was capable of JIT with typing support, but only contained minified/obfuscated transpiled JavaScript housing the implementation details. 2) The build package, which supported AOT production builds, but contained unobfuscated logic and so could only be distributed to partnered builders with whom we had a legal agreement with concerning our IP.
This approach ‘worked’, but was never quite favored – it felt hacky and was difficult to maintain multiple builds…
Needless to say, we had to find a better way.
A Better Way
Enter Angular 6 – with it’s fancy first class support of library generation. Not quite knowing what we were getting into, a port of our 4.x to 6.x was undertaken – and went surprisingly well. From here we worked to break out all of our implementation which was intended to be ‘protected’ in to Angular Libraries (with the help of the Angular CLI and ng-packagr). Once our cleanup efforts were complete, we had a handful of Angular 6 feature libraries and what is essentially a shell application to tie them together.
While I am still struggling to grok the hows and whys that this works, it seemingly just does for now. In Angular 4 Land, we could never quite get our obfuscated/minified package to work for AOT Prod builds, though it worked perfectly fine for JIT builds; hence our need for 2 pacakges. But I am happy to report that the rules are apparently different in Angular 6 Land – as we are now able to create this ‘one package to rule them all’ in a relatively straight forward manner.
During some of the exploratory phase, I’d spoken on gitter with Alex Rickabaugh (@alxhub) about what we were trying to accomplish. While our interactions were small in regards to our Angular 4 efforts, I popped back in to update Alex on the success we’d found with Angular 6 – at which time he requested that I do a quick writeup in the case that it might assist others….
…so here we are…
Here be dragons…
As previously mentioned, the steps are currently pretty straight forward. For the following overview, let’s assume we arrived here from “ng g library awesomesauce”.
– “ng build awesomesauce –prod”
– Navigate to /dist/awesomesauce/
– Delete the esm5, esm2015, esm5, and fesm2015 folders.
– Navigate to /dist/bundles/ and delete the non *.min.* resources and the map associated with your minified bundle.
– Back in /dist/awesomesauce/, open up package.json and make the following edits:
– update ‘main’ to reference the *.min.js bundle in /bundles/
– Delete ‘module’, ‘es2015’, ‘esm5’, ‘esm2015’, ‘fesm5’ and ‘fesm2015’ key/value pairs
– “ng pack”
You are now the proud parent of a ‘secured’ Angular 6 library packaged for installation via NPM into an Angular 6 application – your bouncing new Angular library provides developer typing support for your public APIs, and which more importantly only contains minified/obfuscated implementation logic. Of course this isn’t 100% secure – you still have a considerable amount of information which is exposed in your *.d.ts typing files, and there’s still quite a bit that can be inferred in combination with your included metadata file (which is required for this all to work as described)… This said, I do believe that there’s little/nothing more exposed by this package than has always been the case with JavaScript libraries that provide typing support.
Note: Again, here be dragons. I am not a web security expert. The process described here may or may not stand up to rigorous scrutiny. We’re in the process of vetting this and working to clear the security requirements imposed upon us – but so far this appears to be fitting the bill for us, so perhaps it will for you too.
So I decided to make things permanent! immatt.com is now the official home of Matt Ezell! After years of living at mattezell.info, I’ve decided to make the plunge and go TOP LEVEL! WHAAAA?!?!
While I still hold mattezell.info, I will be redirecting its properties to immatt.com going forward. All new projects coming out of the Matt Brand™ will likely now live somewhere in the vicinity of immatt.com unless otherwise branded.
For those wishing to trip down memory lane, mattezell.info’s original content now lives at archive.immatt.com – I just couldn’t bear to part with it, so there it is… The new blog of course lives here, at blog.immatt.com. I’m still up in the air as to what I am going to put at the root immatt.com, so for now it’s 302 forwarding to here (blog.immatt.com).
Anywhos… Welcome! And tune back in soon to find out what comes next!