Introduction
tl;dr – The popping issue is likely caused by the audio device’s power-saving configuration – and so changing the configuration may eliminate the issue.
I wanted to do a ‘quick’ write up on the ‘audio popping issue’ that many Thinkpad owners have reported, as well as a solution/workaround. I recently purchased an X1 Extreme Gen 2 and quickly noticed the annoying popping issue once I got everything setup with my typical desktop arrangement – e.g. USB C dongle connected to HDMI, with external speakers connected to the LCD receiving the video/audio signal over HDMI.
As many others have reported on various forums around the Internet, the issue essentially manifests as an audible popping noise, which is generally observed just before a sound begins playing or within a few seconds after the sound stops playing. People who play music/video all day often don’t even notice it, as the audio device never actually toggles power states as it is constantly active. The most common way to reproduce the issue when troubleshooting is ensuring that no audio has played for a few seconds, and then playing a short audio file such as a WAV – at which time an audible ‘pop’ may be heard before the sound plays and shortly after the sound finishes.
It’s worth noting that I already somewhat knew where to look to work around this issue, as pretty much every laptop I’ve purchased in the last decade have had this popping issue in one way or the other – and the approach described in this post has by far been the most successful for me in addressing this issue on the various laptop models on which I’ve encountered it.
Overview of Issue
At the heart of this issue is power management settings coupled with hardware operational realities. Within the registry are various settings responsible for controlling the various devices within your computer (amongst other things) – some such settings are ones dealing with how devices are handled when not considered as being in use. For audio devices, this is generally 3 settings:
ConservationIdleTime – this setting controls how long to wait before the device is considered idle when the power management is in a conservation state.
IdlePowerState – What state should the device be moved to when either of the idle time windows has been met.
PerformanceIdleTime – this setting controls how long to wait before the device is considered idle when the power management is in a performance state.
So, essentially our registry is saying “depending on the current power management mode of the PC, change the power state of this device to something else after a period of time of inactivity has passed”.
Unfortunately, this powering down of an audio device isn’t as smooth as we’d often hope. Due to the powering down and powering up of the device, there’s often an audible pop associated with the power state change – and so we’re seeking to eliminate the power state change in order to eliminate the associated popping noise.
Most computers have multiple audio devices – and often all of those devices are affected by this popping issue, though not always. In this writeup, I’m going to focus on the audio device that I am actively using and having this issue with – and I may, at a later time go adjust the others if I identify a need to do so. In my specific situation, I’m using the NVidia High Definition Audio via HDMI – and so we will focus on that.

Modifying the Registry
WARNING: You can mess up your PC via the registry, so proceed with caution when using regedit.
When working with the registry, you’re likely to find a lot of key/value collections that appear to be the same if you go searching around – and this is because they are, as the registry actually uses pointers to find the active setting in play. Ultimately, we’re concerned with ‘CurrentControlSet’ as this is the collection pointing towards the actual settings.
Here is my registry path for the targeted audio device (NVIDIA High Definition Audio):
Computer\HKEY_LOCAL_MACHINE\SYSTEM\CurrentControlSet\Control\Class\{4d36e96c-e325-11ce-bfc1-08002be10318}\0001\PowerSettings
Note: I will provide all matching collections at the end of this document for reference.
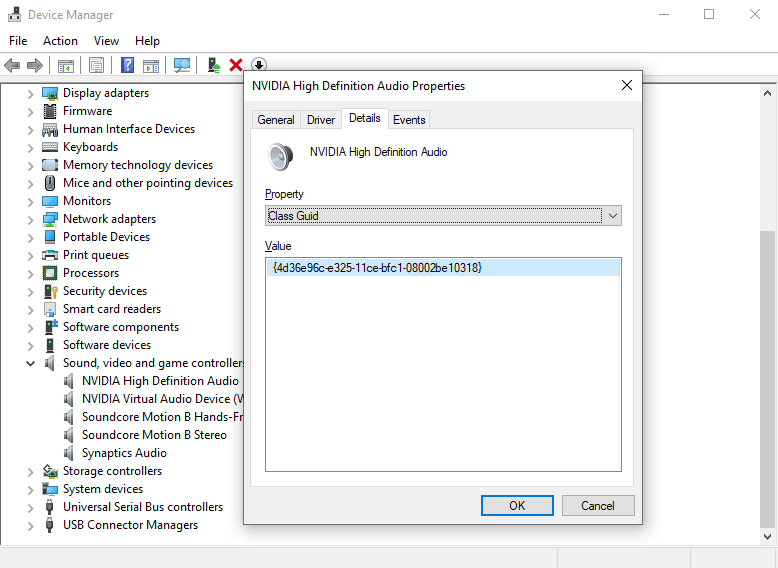
Since I am currently experiencing the popping issue on the NVidia High Definition Audio interface, I’m going to focus on the PowerSettings in the CurrentControlSet for this specific device. To ensure that we’re modifying the correct part of the registry, we can check out our device in Device Manager and ensure that our Class Guid matches the GUID in our registry path (e.g. 4d36e96c-e325-11ce-bfc1-08002be10318):
What we’re seeking to accomplish here is to prevent Windows from putting this audio device into power saving mode – as ultimately it is the power saving mode that’s causing the audible pop when a sound isn’t actively being played.
Here are additional details on this topic:
https://docs.microsoft.com/en-us/windows-hardware/drivers/audio/audio-device-class-inactivity-timer-implementation
https://docs.microsoft.com/en-us/windows-hardware/drivers/kernel/device-power-states
As you may have inferred from the Device Power States document, a state of D0 is the ‘working state’ and D1, D2 and D3 states are various power-saving modes supported by the device.
When looking at our registry configuration, we see the following:
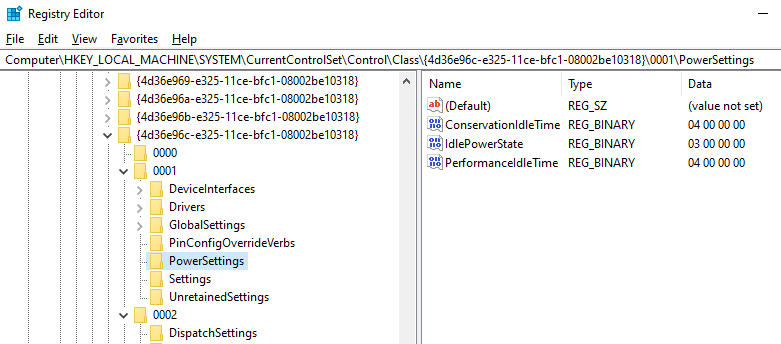
As one may have expected, we see the IdlePowerState for this device is 03, which corresponds with D3 – the most aggressive of the various power-saving states. D3 essentially cuts the device off – it’s this cutting off that results in the audible pop. With consideration of all of the applicable settings here, we’re seeing “when in conservation mode and in performance mode, consider 4 seconds the idle time – when 4 seconds has passed, set the device’s power-saving mode to D3”.
I’m going to go a bit of overkill here by setting the idle time to something that won’t be realistically hit in normal usage, as well as setting the idle mode to ‘working state’ (D0).
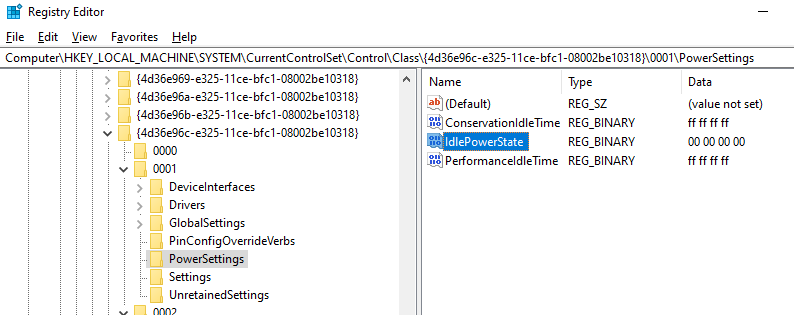
As you can see in the above screenshot, I’ve set the idle times to FF FF FF FF – which translates to 4294967295 decimal, and since this setting is for seconds it means we’ve made it so that 49,710 days must pass before this device is considered idle… As can also be seen from the screenshot, we’ve changed the Idle Power State from D3 to D0 – so even if the idle time is hit, the device should remain in the active D0 state.
After making our changes, we simply need to reboot the PC for them to go into effect. Note: We’re only making changes for Windows, so if you’re experiencing this issue under Linux then you will need to perform similar operations to change how the driver handles power management there.
Conclusion
After making the discussed changes, my pops have essentially gone away. Now I only notice a pop the first time the speakers become activated in my Windows session, as well as when shutting down.
I figure that it’s logical to assume that this may have an impact on battery life since we’ve essentially disabled power management for this audio device, though I am not certain how severe this impact is.
I also don’t know what other side effects this change may have on your system – so proceed with caution, with the understanding that I am not responsible for you borking your system 🙂 As mentioned, I’ve done this on multiple laptops over the years and they are all still functional.
Good luck!
-Matt
Misc
All Registry Matches on my Thinkpad X1 Extreme Gen 2
Nvidia High Definition Audio
Computer\HKEY_LOCAL_MACHINE\SYSTEM\ControlSet001\Control\Class\{4d36e96c-e325-11ce-bfc1-08002be10318}\0001\PowerSettings
Synaptics Audio
Computer\HKEY_LOCAL_MACHINE\SYSTEM\ControlSet001\Control\Class\{4d36e96c-e325-11ce-bfc1-08002be10318}\0002\PowerSettings
Audio Device on High Definition Audio Bus
Computer\HKEY_LOCAL_MACHINE\SYSTEM\ControlSet001\Control\DeviceMigration\Devices\HDAUDIO\FUNC_01&VEN_14F1&DEV_1F86&SUBSYS_17AA229F&REV_1001\4&270001c&0&0001\Driver\PowerSettings
NVIDIA High Definition Audio
Computer\HKEY_LOCAL_MACHINE\SYSTEM\CurrentControlSet\Control\Class\{4d36e96c-e325-11ce-bfc1-08002be10318}\0001\PowerSettings
Synaptics Audio
Computer\HKEY_LOCAL_MACHINE\SYSTEM\CurrentControlSet\Control\Class\{4d36e96c-e325-11ce-bfc1-08002be10318}\0002\PowerSettings
Audio Device on High Definition Audio Bus
Computer\HKEY_LOCAL_MACHINE\SYSTEM\CurrentControlSet\Control\DeviceMigration\Devices\HDAUDIO\FUNC_01&VEN_14F1&DEV_1F86&SUBSYS_17AA229F&REV_1001\4&270001c&0&0001\Driver\PowerSettings
Audio Device on High Definition Audio Bus
Computer\HKEY_LOCAL_MACHINE\SYSTEM\Setup\Upgrade\PnP\CurrentControlSet\Control\DeviceMigration\Devices\HDAUDIO\FUNC_01&VEN_10DE&DEV_0094&SUBSYS_17AA229F&REV_1001\5&2353385e&0&0001\Driver\PowerSettings
Audio Device on High Definition Audio Bus
Computer\HKEY_LOCAL_MACHINE\SYSTEM\Setup\Upgrade\PnP\CurrentControlSet\Control\DeviceMigration\Devices\HDAUDIO\FUNC_01&VEN_14F1&DEV_1F86&SUBSYS_17AA229F&REV_1001\4&270001c&0&0001\Driver\PowerSettings
Intel High Definition Audio
Computer\HKEY_LOCAL_MACHINE\SYSTEM\Setup\Upgrade\PnP\CurrentControlSet\Control\DeviceMigration\Devices\INTELAUDIO\FUNC_01&VEN_14F1&DEV_1F86&SUBSYS_17AA229F&REV_1001\4&270001c&0&0001\Driver\PowerSettings


